Mastering the Art of Modern Publication: A Comprehensive Blueprint for Designing Professional School Yearbooks in Adobe InDesign
NEW YORK — In an era dominated by transient digital feeds and ephemeral social media stories, the timeless tradition of the printed school yearbook remains a steadfast pillar of scholastic culture. Capturing a year’s worth of triumphs, friendships, growth, and community requires more than simply gathering snapshots; it demands deliberate, sophisticated design execution.
For graphic designers, educators, and student publication advisors looking to elevate their institution’s historical record, mastering industry-standard software is essential. A comprehensive new masterclass tutorial outlines precisely how to conceptualize, structure, and build a multi-page, publication-ready yearbook layout using Adobe InDesign, complemented by strategic asset creation in Adobe Photoshop.
Whether starting from a blank canvas or leveraging professional, ready-made templates from creative marketplaces like Envato, this guide demystifies the technical framework behind professional publishing.
Main Facts: The Anatomy of a Professional Scholastic Publication
Creating a cohesive, visually arresting 24-page publication requires a harmonious blend of typography, grid systems, and advanced digital manipulation. According to the foundational workflow established in the tutorial, producing a high-end yearbook relies on several core software components:
Software Integration: Leveraging the precise photo-editing capabilities of Adobe Photoshop to build multi-layered, textured covers, and utilizing Adobe InDesign as the master layout engine for pagination, parent pages, and typography.
Structured Typography: Employing high-impact display fonts (such as Glendale, Michigan Signature, Maksimal, and NexusBold) balanced with readable body styles governed by InDesign’s Paragraph Styles panel.
Advanced Layout Techniques: Utilizing InDesign features including parent (master) pages for automated page numbering, the Pathfinder panel for custom image masking, text-wrap parameters, and dynamic photo grids to organize dozens of faculty and student portraits efficiently.
Thematic Design Elements: Incorporating tactile visual assets—such as torn paper edges, halftone grayscale textures, doodle lines, and custom color swatches—to give digital layouts an organic, scrapbook-like feel.
Chronology: Step-by-Step Architectural Blueprint of the Tutorial
Designing a comprehensive yearbook requires a methodical, sequential approach. The masterclass breaks down the publishing pipeline into five distinct, logical phases:
Phase 1: Designing the Book Cover and Visual Identity
The journey begins outside the publication. Designers first establish the visual tone by opening Adobe Photoshop to create a document sized at 8.75 x 11.25 inches (incorporating standard print bleeds), set to Grayscale at 300 Resolution.
Collage and Textures: Torn paper edges are arranged on the canvas, with student and school life photos placed underneath and refined using Layer Masks.
Halftone Gradients: A halftone grayscale texture is applied at the top layer set to Linear Burn, followed by a 50% opacity black color fill (Overlay) and brightness/contrast adjustments. The flattened asset is saved as a master PSD file.
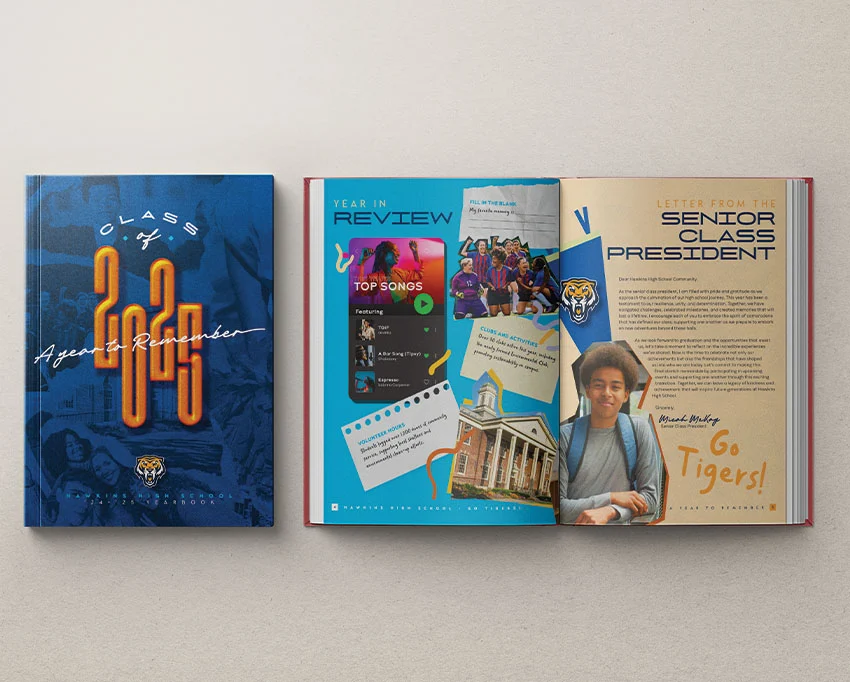
InDesign Setup: In Adobe InDesign, a new 24-page document is initialized (8.5 x 11 inches, 0.5-inch margins, 0.125-inch bleed). The Photoshop cover is placed onto page one at 70% opacity with an Overlay blend mode, layered over a deep custom blue background swatch (C100 M70 Y10 K55).
Typography & Layer Effects: The headline "2025" is typed using NexusBold at an immense 390 pt, then customized with a robust suite of InDesign effects: Drop Shadows, Inner Shadows, Inner Glows, Bevel and Emboss, Satin texturing, and Basic Feathering, finished off with official school branding and mascot logos.
Phase 2: Structuring the Table of Contents and Parent Spreads
Efficiency in multi-page documents relies heavily on master templates.
Page 2 Integration: The table of contents is typed out using a curated mix of the project’s signature fonts.
Automated Footers via Parent Pages: Designers double-click the A-Parent spread in the Pages panel to construct a dedicated Footer layer. Using InDesign’s special character markers (Insert Special Characters > Markers > Current Page Number), dynamic page numbering is automated across the spread alongside the school’s name.
Background Atmosphere: A subtle 40% opacity halftone texture is applied across the background, paired with a faint 7% opacity school mascot watermark to maintain high legibility for text overlays.
Phase 3: Crafting Narrative Spreads (Principal’s Letter & Year in Review)
Moving into the body of the book, pages 3 through 5 introduce editorial content and narrative pacing.
Custom Image Masking: The principal’s portrait is combined with a custom vector shape created via the Pen Tool (P). Utilizing the Pathfinder panel (Subtract), the image is cropped into a dynamic silhouette, enhanced by an orange drop shadow.
Text Wrap Integration: To ensure seamless readability, InDesign’s Text Wrap panel is engaged with the "Wrap around object shape" setting, offset cleanly by 0.3125 inches.
Year in Review: Page 4 shifts to pop-culture and school milestones, utilizing geometric shapes (Ellipse and Rectangle tools) to simulate Spotify-style music graphics, paired with torn paper assets and candid event photography.
Phase 4: Special Sections (Awards, Clubs, and Student Life Articles)
The middle spreads of the publication celebrate community and individuality.
Superlatives & Awards (Pages 6–7): Four dedicated frames are built per spread utilizing the Rectangle Frame Tool (F), accented with black drop shadows, light blue strokes, and clean horizontal naming bars for "Most Creative" or "Class Clown" winners.
Clubs, Teams, and Polaroids (Pages 8–9): A rich color block background (C0 M77 Y68 K0) sets the stage for polaroid-style photo frames, descriptive text boxes mounted on torn paper rips, and playful doodle graphics.
The Daily Life Feature Article (Pages 10–11): Titled "A day in the life at Hawkins High School," this spread demonstrates complex collage art through overlapping rectangular image frames, paired with comprehensive multi-column text blocks detailing student experiences.
Phase 5: Portrait Grids, Autographs, and the Back Cover
The final leg of the publication transitions from narrative storytelling to systemic documentation.
The Faculty Photo Grid (Pages 12–13): Rather than placing portraits manually one by one, designers use a powerful InDesign shortcut: dragging out a master Rectangle Frame Tool (F) and tapping the Right and Down Arrow keys to instantly generate an evenly spaced photo grid. Staff headshots are placed en masse, followed by name captions.
Student Class Spreads (Pages 14–21): The grid methodology is scaled across subsequent pages to catalog underclassmen and graduating seniors.
Farewells and Finales: The penultimate spread intentionally leaves blank, open layout spaces for student autographs and farewell messages. Finally, the back cover mirrors the design language of the front cover to bookend the publication professionally.
Supporting Data: Specifications and Technical Parameters
For print production managers and student editors preparing files for commercial presses, adhering to strict technical specifications prevents costly pre-press errors. Key parameters utilized in this publishing workflow include:
Parameter Category
Specification Standard
Purpose / Function
Document Dimensions
8.5 x 11 inches (Trim Size)
Standard US Letter size for portrait-oriented school publications.
Bleed Settings
0.125 inches (All Sides)
Ensures color backgrounds and images extend past the cut line, preventing white borders during trimming.
Margins
0.5 inches
Maintains safe framing for all body text, running headers, and folio numbers.
Color Space (Covers)
Grayscale / 300 PPI (Photoshop)
High-resolution raster preparation before importing into vector/layout software.
Establishes a strict visual hierarchy, guiding the reader’s eye from major focal points to readable captions.
Official Guidance and Professional Perspectives
As schools increasingly look for ways to balance traditional print heritage with modern digital publishing workflows, industry experts emphasize the importance of adopting professional asset management and template structures.
"The challenge of modern yearbook design is bridging the gap between chaotic, unorganized collections of smartphone snapshots and a cohesive, editorial-grade historical document," notes design curriculum specialists. "By utilizing Adobe InDesign’s advanced grid generation tools, parent page automation, and non-destructive styling panels, student staffs can achieve professional publishing standards without sacrificing creative expression."
Furthermore, educators note that teaching students how to navigate professional layout software provides valuable, real-world graphic design experience that extends far beyond the classroom walls. For institutions operating under tight production schedules, utilizing pre-built industry templates—such as the customizable INDD and Canva school yearbook frameworks available on digital creative marketplaces—offers an efficient alternative that guarantees high-end visual results.
Implications: The Future of Scholastic Publishing and Design Education
The detailed methodology outlined in this InDesign masterclass carries significant implications for the broader landscape of student journalism and educational design:
Democratization of High-End Design: Advanced publishing techniques once reserved for professional advertising agencies—such as complex vector pathfinding, custom layer blending modes, and dynamic text wrapping—are now directly accessible to high school and collegiate publication teams.
Hybrid Print-Digital Workflows: With many template suites now offering simultaneous compatibility across Adobe InDesign (INDD) and web-based platforms like Canva, editorial staffs have unprecedented flexibility in collaborative editing, remote proofing, and multi-format output (ranging from physical hardcover books to digital flip-books).
Preservation of Tangible Heritage: In an increasingly digitized society, the physical yearbook acts as a permanent, tactile anchor for community history. High design standards ensure these volumes are preserved, cherished, and looked back upon with pride for decades to come.
By pairing technical mastery in Adobe Creative Cloud with structured design frameworks, creators can ensure that the stories, friendships, and milestones of every academic year are commemorated with the artistic dignity they deserve.