Master the Art of Memory: A Comprehensive Guide to Designing Professional School Yearbooks in Adobe InDesign
NEW YORK — In an era dominated by transient digital feeds and ephemeral cloud storage, the physical school yearbook remains an enduring artifact of academic legacy. Capturing a year’s worth of triumphs, friendships, and milestones requires more than just dumping snapshots onto a page—it demands intentional design, typographic hierarchy, and structural precision.
For graphic designers, educators, and student publications teams looking to elevate their commemorative publications, mastering industry-standard tools like Adobe InDesign and Photoshop is essential. A newly published masterclass tutorial provides a definitive, step-by-step roadmap for building a stunning, multi-page school yearbook layout from scratch, while also highlighting plug-and-play alternatives available on platforms like Envato Elements.
Main Facts: The Anatomy of a Modern Yearbook
Creating a publication that resonates with students and faculty alike involves bridging creative vision with technical execution. The comprehensive design framework breaks down into several core competencies:
Software Integration: Utilizing Adobe Photoshop for high-end cover textures and Adobe InDesign for multi-page document architecture.
Structural Efficiency: Leveraging InDesign’s parent pages (formerly master pages), paragraph styles, and automated page numbering to maintain consistency across a 24-page signature.
Dynamic Visual Elements: Implementing advanced digital collage techniques, text wrapping around complex clipping paths, and repeating stylistic accents like halftone textures and torn paper edges.
Ready-Made Alternatives: For teams operating under tight academic deadlines, fully customizable templates compatible with InDesign (INDD) and Canva offer streamlined pathways to professional results.
Chronology: Step-by-Step Execution of the Yearbook Project
Building a comprehensive, print-ready yearbook requires a disciplined workflow that moves from foundational covers to interior spreads and final sign-offs.
Phase 1: Designing the Book Cover in Photoshop
The journey begins outside InDesign. Designers start by establishing a canvas in Adobe Photoshop measuring 8.75 x 11.25 inches at 300 DPI in Grayscale mode (accounting for standard print bleeds).
Textured Foundations: Assets like torn paper edge vectors are arranged strategically across the workspace.
Masking Imagery: Student and campus life photography is tucked beneath the paper layers, utilizing Layer Masks to trim any overhanging edges cleanly.
Texture Overlays: A grayscale halftone texture is placed over the composition, blended using Linear Burn, supplemented by an Overlay color fill, and refined with a Brightness/Contrast adjustment layer before saving out as a high-resolution PSD.
Phase 2: Setting Up the InDesign Document
Transitioning to Adobe InDesign, the designer initializes the primary project file.
Document Settings: Dimensions are set to standard letter size (8.5 x 11 inches) spanning a robust 24 pages, featuring 0.5-inch margins and a 0.125-inch bleed.
Cover Integration: The Photoshop PSD cover is placed, adjusted to 70% opacity, and set to an Overlay blend mode.
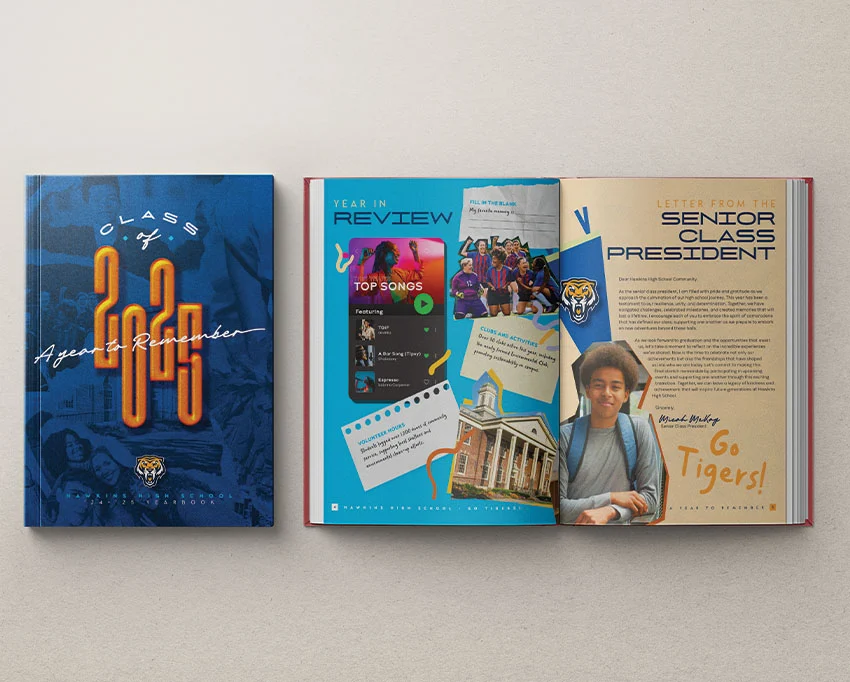
Color Palette & Typography: A deep blue background swatch (C100 M70 Y10 K55) anchors the palette. Display typography utilizes high-impact fonts like Glendale, Michigan Signature, and NexusBold for striking headline treatments, enhanced through InDesign’s native drop shadows, inner glows, and bevel effects.
Phase 3: Building the Table of Contents and Parent Pages
Consistency is the hallmark of professional publishing.
Footer Automation: By accessing the A-Parent spread in the Pages panel, designers insert automated current page numbers combined with school branding into dedicated footer layers. Dual parent spreads are created to accommodate both light and dark background themes seamlessly.
Text Hierarchy: Page 2 introduces the Table of Contents, set against a subtle 40% opacity halftone background and school mascot watermark.
Phase 4: Crafting Editorial Spreads and Features
Interior pages balance narrative content with visual storytelling.
Principal’s Letter: Page 3 features the official welcome message. Using the Pen Tool, designers trace an outline around the principal’s portrait, applying the Pathfinder Subtract function to create a custom cutout mask finished with a vibrant drop shadow.
Text Wrap Mechanics: InDesign’s text wrap feature is deployed around the custom-shaped portrait, utilizing a 0.3125-inch top offset to ensure clean typography flow.
Year in Review: Page 4 shifts into pop-culture and school highlights, incorporating custom music graphics built via basic geometric tools alongside ripped-paper information blocks.
Phase 5: Special Sections, Clubs, and Photo Grids
As the publication progresses, modular design systems keep the layout engaging.
Awards & Superlatives: Spreads 6 and 7 utilize framed photo boxes with subtle strokes and horizontal name bars for categories like "Most Likely to Succeed" or "Class Clown."
Clubs and Athletics: Pages 8 and 9 employ polaroid-style frames over rich color fields, paired with candid action shots and decorative doodle lines.
Advanced Photo Grids: For Faculty & Staff (Pages 12–13) and student body sections, designers master the art of rapid grid generation. By dragging out a Rectangle Frame Tool and tapping the right and down arrow keys during creation, InDesign instantly generates a uniform grid of frames, drastically accelerating the placement of headshots and staff names.
Supporting Data: Specifications and Asset Requirements
To execute a project of this scale successfully, production teams must assemble a precise toolkit of digital assets and technical parameters:
Standard Print Specifications: 8.5" x 11" finished size, 300 Resolution (PPI), CMYK/Grayscale color space depending on print vendor requirements, and a 0.125" (1/8 inch) bleed on all outer edges.
Recommended Typography Mix:
Headlines: Glendale (Expanded Sans) or NexusBold (Condensed Sans) for high-impact visual weight.
Accents & Subtitles: Michigan Signature or Maksimal for a personal, handwritten touch.
Layer Effects Parameters: Utilizing InDesign’s native Effects panel to apply Inner Shadows, Satin textures, and Feathering helps break up flat digital surfaces, mimicking the tactile quality of physical scrapbooks.
Official Responses and Industry Insights
Design educators and publishing professionals have long emphasized the pedagogical value of yearbook creation. According to curriculum leads in scholastic journalism, guiding students through the process of layout design fosters critical workforce skills.
"When students engage with professional publishing tools like InDesign, they aren’t just putting together a memory book—they are learning grid theory, visual hierarchy, color theory, and collaborative workflow management," notes a senior design curriculum developer. "The integration of textured elements with clean vector structures teaches them how to balance modern design trends with timeless publishing traditions."
Industry platforms echo this sentiment, noting a massive surge in demand for hybrid templates that support both desktop software (Adobe InDesign) and browser-based collaborative design suites (Canva), allowing entire student committees to contribute safely under the supervision of a lead publication advisor.
Implications for Schools and Student Publications
The democratization of professional design tutorials and pre-built templates carries profound implications for academic institutions operating on constrained budgets.
Cost Efficiency: Schools no longer need to rely exclusively on expensive, proprietary publishing house software or outsourced design agencies. By utilizing InDesign tutorials and Envato asset collections, yearbook advisors can produce bespoke, highly original publications internally.
Skill Development: Student editors gain hands-on experience with industry-standard Adobe applications, giving them a competitive head start in graphic design, journalism, and digital media careers.
Archival Quality: As demonstrated in the final stages of the tutorial—which includes dedicated space for student farewells, autograph pages, and professional hardcover mockups—the resulting publication bridges the gap between digital-native students and the tangible, emotional weight of a physical keepsake.
Whether built entirely from scratch using advanced InDesign techniques or assembled via flexible, ready-made templates, the modern school yearbook remains a triumphant testament to a year well-lived—and a masterclass in modern graphic design execution.