










In the fast-paced landscape of digital media production, visual consistency can make or break a video project. Whether you are cutting a cinematic 4K documentary for a theatrical release, assembling a corporate marketing piece, or spinning up high-engagement vertical content for Instagram Reels and YouTube Shorts, mastering fundamental editing techniques is non-negotiable. Among these essential skills, learning how to resize an image in Premiere Pro stands out as a core competency.
This comprehensive guide takes you step-by-step through the mechanics of image scaling, framing optimization, and modern aspect-ratio management in Adobe Premiere Pro. By leveraging precise manual controls in the Effect Controls panel alongside rapid-alignment tools in the Properties panel, you can eliminate unwanted black bars, banish floating images, and ensure every single frame looks deliberately crafted.
Main Facts: The Anatomy of Image Scaling in Premiere Pro
When you drop a still photograph, graphic, or digital asset onto an Adobe Premiere Pro timeline, the software relies on pixel dimensions to determine its initial presentation. However, a digital camera’s raw output or a stock image from platforms like Envato Elements rarely matches your sequence’s native resolution precisely.
- The 100% Baseline: By default, Premiere Pro places imported images at 100% Scale. If your sequence is 1080p (1920×1080) and your image is also 1920×1080, it will fill the frame edge-to-edge.
- Aspect Ratio Mismatch: If your image dimensions do not match your sequence aspect ratio (such as dropping a 16:9 horizontal image into a 9:16 vertical timeline), scaling adjustments become mandatory.
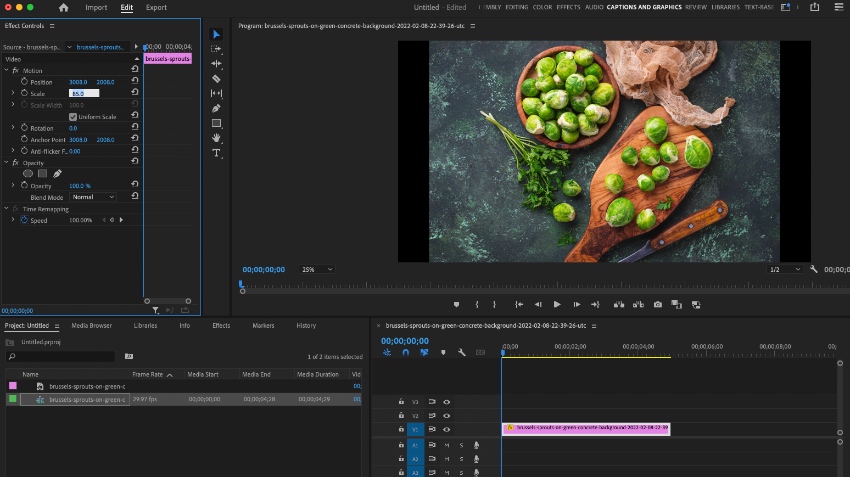
- The Scale Parameter: Located under the Motion dropdown in the Effect Controls panel, the Scale value allows editors to expand or reduce the asset using precise percentages centered on an anchor point.
- Resolution Limits: Scaling an image significantly past its native 100% threshold stretches existing pixels, which can lead to visible pixelation and a loss of clarity.
Chronology: A 4-Step Walkthrough to Resizing Images
Transitioning from guesswork to absolute creative control requires knowing exactly where to click. Below is the sequential workflow for resizing any still graphic or photograph inside a Premiere Pro project.
Step 1: Add an Image to the Timeline
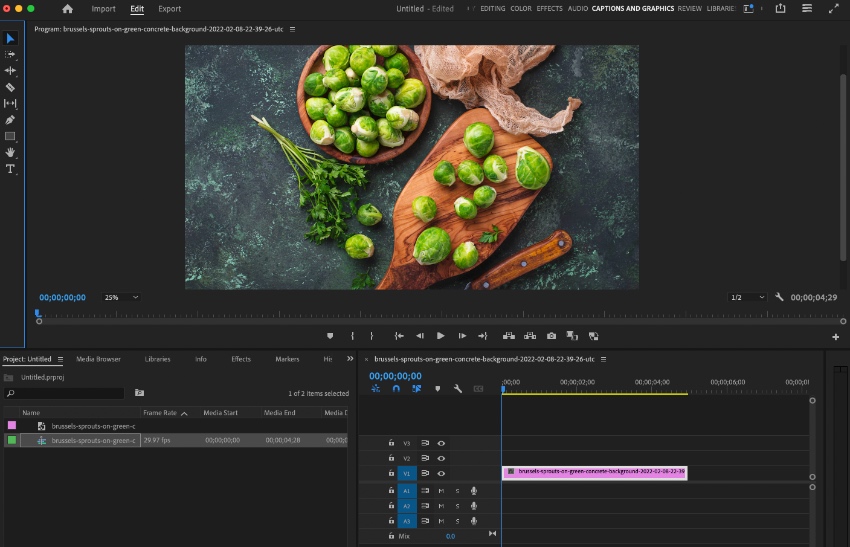
Before you can manipulate an asset, it must live inside your sequence. Open your project in Premiere Pro, locate your source file on your local drive or asset library, and drag it directly into the Timeline panel located at the bottom center of your workspace. Drop the file onto a video track (such as Video 2 or Video 1).
Step 2: Launch the Effect Controls Panel
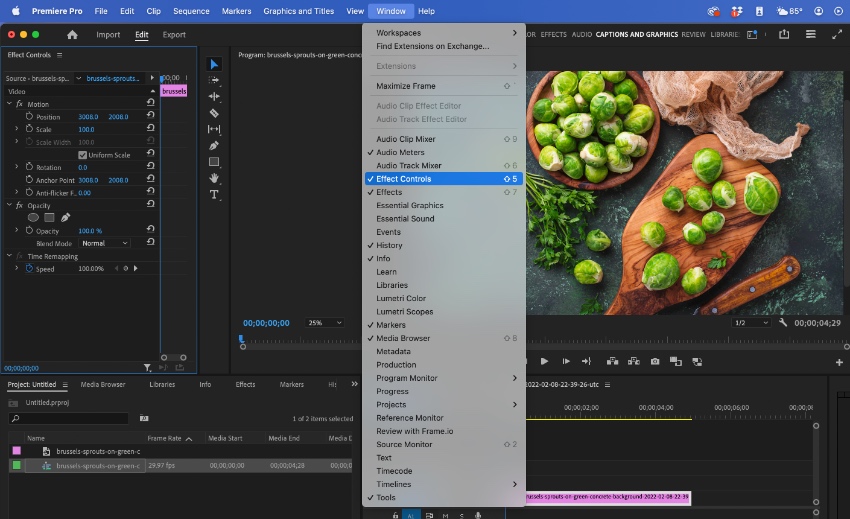
Once the image is placed, select the clip in your timeline. To access the sizing parameters, navigate to the top menu bar and select Window > Effect Controls. This opens the Effect Controls sidebar, typically docked next to your Program Monitor on the left side of the interface. If the parameters do not appear immediately, double-check that your image clip is actively highlighted in the timeline.

Step 3: Adjust the Image Scale
Inside the Effect Controls panel, twirl open the Motion property group. Here, you will find the Scale setting, which defaults to 100%.
- To make an image smaller, click the numerical value box and type a number below 100, or click and drag the blue digits to the left.
- To enlarge an image—often necessary to fill annoying black letterbox or pillarbox bars—type a value greater than 100.
(Pro Tip: Under the Properties panel, modern versions of Premiere Pro also feature dedicated Fit and Fill buttons under the Transform section, enabling instantaneous alignment with a single click.)
Step 4: Preview the Finished Result
Never trust a static edit without checking motion playback. Press the spacebar to play your sequence from the head of the clip. This preview ensures that your image fills the frame cleanly and that no unexpected edges or background distractions peek through. If your image shifts off-center during scaling, simply double-click the asset directly inside the Program Monitor and drag it manually to reposition it.
Supporting Data: Best Practices for Resolution and Multi-Platform Delivery
As video distribution diversifies across widescreen desktops, mobile-first vertical feeds, and square social media carousels, editors must balance creative framing with technical constraints.
Avoiding Pixelation and Blurriness
Quality degradation is the enemy of professional video production. When you scale an image beyond 100%, Premiere Pro interpolates existing pixels rather than generating new data. To maintain crisp, high-definition output:
- Always source images that match or exceed your sequence resolution (e.g., minimum 3840×2160 for 4K workflows).
- Use preview settings at 100% playback resolution in the Program Monitor to evaluate true sharpness before committing to an export.
Batch-Processing and Efficiency
When working on large slideshows or photo-heavy video essays, resizing every image individually is inefficient. Once you have perfected the scale on a single clip:
- Copy the clip using
Cmd + C(Mac) orCtrl + C(Windows). - Select your remaining target images in the timeline.
- Navigate to Edit > Paste Attributes (
Cmd + Option + VorCtrl + Alt + V). - Check the Motion box in the dialogue menu and click OK.
This action instantly applies identical scaling and position data across multiple assets, securing uniform framing throughout your sequence.
Official Industry Perspectives and Workflow Implications
Industry veterans and technical directors emphasize that minor timeline hygiene tasks—such as image scaling—profoundly influence the perceived production value of a piece.
"When visuals fit the frame cleanly without unnatural stretching, awkward framing crops, or distracting black bars, an edit immediately projects professionalism," notes post-production workflow specialist Sarah Jenkins. "In today’s multi-platform delivery ecosystem, editors cannot afford to treat framing as an afterthought."

Furthermore, as digital creators increasingly build content intended to simultaneously populate YouTube, TikTok, and Instagram, the ability to rapidly swap between aspect ratios using intelligent scaling commands reduces delivery friction. Creative asset ecosystems like Envato Elements have adapted to this demand by offering millions of high-resolution stock assets, professional video templates, and pre-formatted motion graphics designed to drop seamlessly into modern non-linear editing suites without requiring exhaustive manual cleanup.
Broader Implications for the Future of Video Editing
The mechanics of resizing an image in Premiere Pro extend far beyond basic composition housekeeping. As creative workflows lean heavier into automated reframing, AI-assisted asset generation, and multi-format content distribution, understanding the foundational math behind pixels, aspect ratios, and scaling anchor points remains a critical differentiator for editors.
Whether you are animating a dynamic zoom effect using keyframes to inject kinetic energy into a static photograph or prepping a batch of vertical assets for mobile consumption, intentional framing safeguards the integrity of your visual narrative.
Resize with intention. Create without limits.