










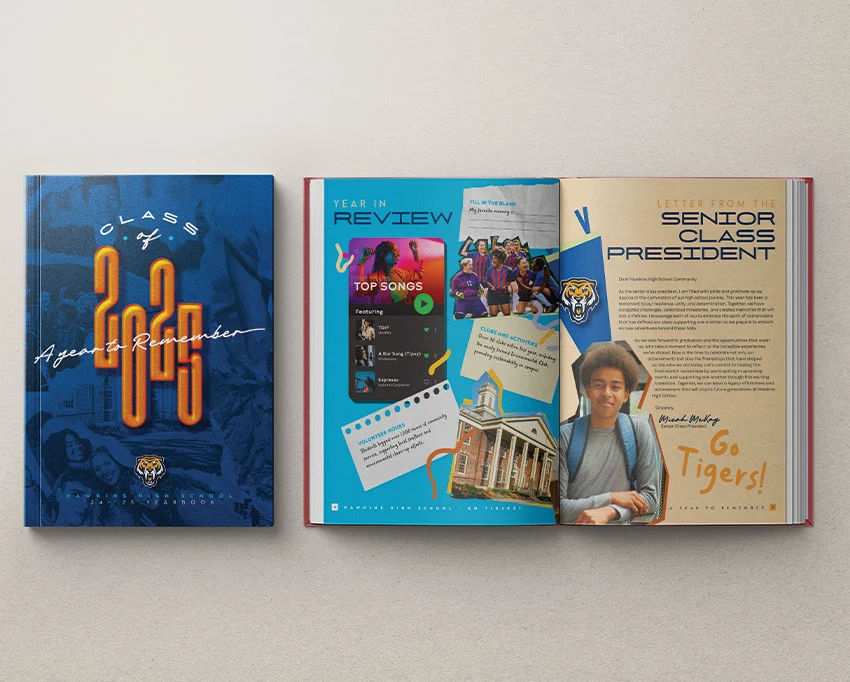
ABSTRACT: In the digital age, the physical school yearbook remains a treasured artifact, bridging generations of students and preserving academic milestones. Designing a cohesive, professional 24-page yearbook requires technical proficiency in layout software, an eye for typography, and a strategic approach to photo organization. This guide explores a professional workflow utilizing Adobe Photoshop and Adobe InDesign, detailing everything from custom cover generation and dynamic text wrapping to multi-page grid structures and alternative template resources.

1. Introduction: The Enduring Legacy of the School Yearbook
Despite the ubiquitous nature of cloud-based photo albums and social media feeds, the printed school yearbook holds an irreplaceable place in the cultural ecosystem of educational institutions. It represents a tangible archive of formative years, encapsulating athletic victories, academic breakthroughs, club camaraderie, and everyday hallway interactions.

For graphic designers, educators, and student editors tasked with compiling these keepsakes, the challenge lies in transforming thousands of disparate raw assets—candid snapshots, formal portraits, and institutional text—into a unified, visually striking narrative.

Achieving this standard requires more than simply dropping photos onto a blank canvas. It demands a rigorous design system utilizing Adobe InDesign and Adobe Photoshop. By leveraging professional tools such as paragraph styles, parent pages (formerly master pages), grid-building shortcuts, and advanced blending modes, designers can produce publication-grade layouts that honor the institution’s history while captivating contemporary readers.

2. Chronological Workflow: From Blank Canvas to Print-Ready PDF
Designing a comprehensive multi-page publication like a 24-page school yearbook requires a disciplined, step-by-step methodology. Rushing into layout design without proper asset preparation invariably leads to formatting inconsistencies, resolution errors, and missed deadlines. Below is the chronological blueprint for constructing a professional yearbook from the ground up.

Phase One: Asset Curation and Cover Design (Adobe Photoshop)
The visual identity of a yearbook is established on its front cover. Before opening InDesign, designers must prepare high-resolution graphical elements and textured backdrops.

- Document Setup: Launch Adobe Photoshop and establish a canvas measuring 8.75 x 11.25 inches (incorporating standard bleed dimensions). Set the color mode to Grayscale and the resolution to an uncompromised 300 PPI to ensure crisp printing plates.
- Layering Rips and Edges: Import vector or rasterized torn paper assets and arrange them strategically across the composition to frame upcoming student photography.
- Photo Masking: Layer student and school-life imagery beneath the torn paper elements. Implement precise Layer Masks to clip any photographic bleed extending past the organic paper boundaries.
- Texturing and Grading: Enhance the visual depth by applying a halftone grayscale texture. Set this texture layer to Linear Burn blending mode. Introduce a solid black Color Fill layer set to Overlay at 50% opacity, topped with a Brightness and Contrast adjustment layer (boosting brightness to +79). Save this foundational artboard as a high-resolution PSD file.
Phase Two: Document Initialization and Cover Integration (Adobe InDesign)
With the cover graphics prepared, the core document environment must be initialized in InDesign.

- Grid and Margin Specifications: Create a new InDesign document set to standard letter size (8.5 x 11 inches), spanning 24 pages. Define consistent margins at 0.5 inches and incorporate a 0.125-inch bleed on all outer edges.
- Placing the Cover: Use the
File > Placecommand to import the previously saved Photoshop cover file onto page one. Modify its visual characteristics by setting the Opacity to 70% and the Blend Mode to Overlay. - Establishing the Color Palette: Generate a deep, sophisticated institutional blue swatch within the Swatches panel using CMYK values of C100, M70, Y10, and K55. Flood the background utilizing the Rectangle Tool, ensuring this layer sits securely beneath the photo collage elements.
- Typography and Layer Effects: Implement bold, modern typefaces—such as Glendale and Michigan Signature—alongside a bold condensed sans-serif like NexusBold (scaled to 390 pt) to announce the graduating class year. Elevate the typography using InDesign’s native Effects panel: apply a nuanced Drop Shadow, an Inner Shadow (using a paper swatch), an Inner Glow (using a vibrant fuchsia swatch), a classic Bevel and Emboss, and a Satin effect to give the text striking dimensionality.
3. Supporting Data and Structural Layouts: Building the Publication Body
Once the cover and introductory elements are secured, attention shifts to the interior spreads, where information architecture and readability take center stage.

The Table of Contents and Footer Automation
On Page 2, clear typographic hierarchies are established using distinct font pairings for headings and subheadings. To maintain structural consistency across all 24 pages, designers must utilize InDesign’s Parent Page architecture:

- Double-click the A-Parent spread in the Pages panel.
- Employ the Type Tool to create a small frame in the corner, then right-click to insert a special character marker for the Current Page Number.
- Add a companion text box for the school’s name. Duplicate these elements for facing pages, and create an alternate parent variation with lighter text fills for dark background spreads.
Editorial Spreads: Letters and Year-in-Review Graphics
Pages 3 through 5 set a narrative tone via letters from the school principal and the class president, accompanied by thematic reflections.

- Pathfinder Clipping: When incorporating portraits of leadership, enhance visual dynamism by drawing a custom vector outline with the Pen Tool over the subject’s photo. Select both the image and the custom shape, then navigate to the Pathfinder panel and select Subtract. Apply a warm orange drop shadow to the resulting silhouette.
- Advanced Text Wrap: To ensure body copy flows naturally around these dynamic cutouts, select the masked photo, open the Text Wrap panel, choose Wrap around object shape, and assign a Top Offset of 0.3125 inches.
- Infographic Elements: Page 4 acts as a cultural time capsule. Utilize basic shape tools (Ellipse and Rectangle) alongside halftone background fills to construct mock music player graphics representing the top anthems of the academic year, interspersed with candid snapshots and doodle patterns.
Special Recognitions, Clubs, and Athletics
Pages 6 through 9 transition into student life, featuring superlative awards and athletic/club achievements.

- Polaroid Grids: Using the Rectangle Frame Tool, construct balanced arrangements reminiscent of instant film prints. Couple these frames with descriptive captions set in stylized display fonts.
- Thematic Color Coding: Shift the background palettes to suit specific sections—utilizing rich cyan-magenta mixes (C0 M77 Y68 K0) paired with subtle halftone overlays to demarcate sports and extracurriculars from formal academic rosters.
4. Official Guidelines: Mastering Photo Collages and Grids
Handling dozens—sometimes hundreds—of student and faculty portraits requires efficient, repeatable layout mechanisms to prevent editorial chaos.

Constructing Dynamic Photo Collages
For narrative spreads such as "A Day in the Life" (Pages 10 and 11), structured asymmetry creates visual interest:

- Establish a deep blue background complemented by a low-opacity halftone texture.
- Build a prominent editorial headline utilizing a tripartite font system (NexusBold, Glendale, and Maksimal).
- Draw multiple overlapping rectangles of varying proportions using the Rectangle Tool (
M), and populate them with candid photography viaFile > Place. Frame these photo blocks with adjacent journalistic text columns detailing student life.
Automated Photo Grids for Faculty and Student Rosters
When organizing large volumes of headshots for faculty members (Pages 12 and 13) and senior class rosters (Pages 14 through 21), manual placement is inefficient. InDesign offers an automated grid creation tool:

- Select the Rectangle Frame Tool (
F) and click-and-drag across the desired canvas area. - Before releasing the mouse button, tap the Right Arrow and Down Arrow keys to dynamically subdivide the frame into an evenly spaced multi-row, multi-column photo grid.
- Use the
File > Placecommand to batch-import headshots into the generated grid. InDesign will populate the cells sequentially. Complete the roster by typing faculty or student names beneath each respective frame using pre-defined paragraph styles for absolute typographic uniformity.
Concluding Spreads: Autographs and Back Covers
- The Farewell Spread: Near the conclusion of the publication, allocate dedicated blank or minimally styled spreads featuring subtle line graphics to serve as an autograph and farewell message space for parting students.
- The Back Cover: Mirror the visual motifs established on the front cover by featuring an artistic collage of student life imagery, cementing the publication’s cohesive design language from start to finish.
5. Implications and Alternative Design Resources
Producing a professional yearbook in Adobe InDesign equips designers with transferable skills in grid construction, style sheet management, and asset coordination. However, tight school deadlines and varying skill levels within student media staffs often necessitate flexible production workflows.

For teams seeking rapid deployment without sacrificing aesthetic integrity, a robust marketplace of alternative templates exists. Platforms like Envato Elements offer fully customizable assets across multiple formats:

| Template Name | Supported Formats | Ideal Use Case |
|---|---|---|
| School Yearbook Template | INDD, Canva | Comprehensive multi-page layouts highlighting general student and teacher achievements. |
| Yearbook Brochure Template | INDD, Canva | Shorter, highly visual summary brochures for student activities and milestones. |
| School Yearbook (YGKH2V) | INDD | Extensive 25+ page print-ready documents featuring multiple cover variants and collages. |
| Digital Yearbook Template | INDD, Canva | Optimized for digital viewing across universities and colleges emphasizing modern student life. |
By pairing foundational InDesign tutorials with professionally crafted mockups (such as hardcover book presentation sets), publishing teams can elevate their final output from a simple school project into a gallery-quality heirloom. Whether building a layout from scratch or adapting a pre-made asset, adherence to professional design principles ensures that memories of the academic year are preserved with the elegance and durability they deserve.